|
HKC KNITTING MACHINES |
|
BUY WITH CONFIDENCE OVER 26 YEARS IN MACHINE KNITTING |
I first published this eBay guide in October 2008 they have proved to be very popular so I have included them within my own website. I intend to bring these guides up to date from time to time, so please bookmark this page. I hope you find it useful.
PART 2. ADJUSTING A BROTHER RIBBER ON THE KNITTING MACHINE
This is a two part guide on the Brother
ribber.
Part 1 is installing your ribber properly onto the knitting
machine, it can be found at:
KNITTING MACHINES: PART 1, INSTALLING A BROTHER RIBBER.
This
is Part 2, making the necessary adjustments before knitting.
About this Guide:
I have written this guide to help you understand how to be able to
adjust the Brother Ribbing attachment in conjunction with the range of
main bed Brother Knitting Machines. It has been written from an
engineer’s point of view to help you make the necessary adjustments to
enable you to setup the ribber properly allowing you to get the very
best finish from your work. I have not tried to cover all of the
features or the full workings of the gadget, I have not covered any of
the many knitting techniques you can use with a ribber, I may do that
later in another guide.
Disclaimer:
I must make it clear I have written this guide from my personal
experience, I may not have covered 100% of all aspects of the topic. In
some cases I am giving you my opinion, I accept that others may not
agree. I accept no responsibility for any mistakes what so ever. Any age
of these machines given is very approximate and is based from the date
of writing this article 9th April, 2008.
About us:
Carol has been a machine knitter for over twenty six years & has been
selling machine knitting since 1985 when we started our first shop.
Lionel is a Brother trained Knitting Machine engineer, he does all of
our repairs & servicing, he has supplied all of the technical
information for this guide. Now we specialize in supplying and servicing
the range of Brother Knitting Machines. We have probably the largest
range of spares and second hand refurbished Brother Machines in the
UK. Carol has designed and published nineteen pattern books for machine
knitting.
Index for this guide:
1. Turning the mast around.
2. Aligning the needles on the machine & the ribber.
3. Adjusting the gap between the machine & the ribber
lease note that this is part two of my eBay guide to help you get the
best out of the Brother Ribber. I recommend that you read and carryout
the information I gave in Part 1 before you start to make the
adjustments I am about to tell you in Part 2. I have had to split the
topic of the Brother Ribber into two separate guides because of the
limitation on the number of photos eBay will allow in any one guide.
I will now start from where I left off at the end of part 1.
You should have the machine and ribber firmly connected both should be
attached to the table.
PART 2. ADJUSTING A BROTHER RIBBER ON THE KNITTING MACHINE
1. Turning the mast around.
At this stage we need to install the mast. If your
machine has been used as a single bed knitter, attached
to a table flat then now that the machine and ribber are
lying back at an angle the mast will need to be turned
around. This is important to get right. You DO NOT bend
it into shape, I see this over and over again it
accounts for a considerable number of the tension
problems that a novice knitter can have. This is covered
in the KR850 ribber instruction book on page 7. You need
to turn the mast around the opposite way from the way
you have been using it as a single bed.
Take the mast top off and put it on the
other way round, now pass the triangular yarn guides
around to the other side of the upright, finally you can
now place the complete mast back into the machine.
Alternatively you can loosen the screw and turn it
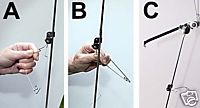
around to the opposite side. Study pictures ‘A’ ‘B’ &
‘C’ you should see what I mean. If you look at the
bottom of the upright you will see that there is a bend,
it is this bend that dictates the angle of the upright.
2. Aligning the needles on the machine & the ribber.
Now let's adjust the needles, the object of this excise is to
line up the needles on the ribber with the needles on the machine so
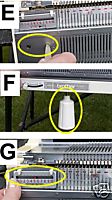
that they are directly opposite each other when the swing knob, (see
picture ‘F’ circled in yellow) is set to 5, and the pitch lever
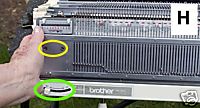
(see picture 'H' circled in green) is set to P for pitch. Start by
loosening the two screws located on the face plate, left hand side of
the ribber, (see picture ‘E’ & H circled in yellow). I do mean loosen
NOT UNDO, caution, if you undo these screws you could cause a severe
problem, just a turn should be enough. Bring up a few needles on the
ribber, say 5 or 6, now bring forward a similar amount on the knitter,
so as they come towards each other within touching distance but they do
not pass. If the heads of the needles are not directly opposite then you
will need to gently move the ribber left or right, (see picture ‘H’)
bringing the needles directly opposite each other. Once this is achieved
then you can lock the two screws which will stop the ribber moving any
further on it’s own. .
3. Adjusting the gap between the machine & the
ribber.
Now we will turn our attention to the height adjustment, the distance or
gap between the ribber and the main bed. We need to adjust both sides of
the ribber. Let’s start with the left hand leg. Drop down the ribber to
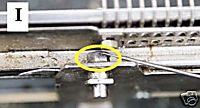
the first stop. You will find a nut located on the top of the leg, (see
picture ‘I’ circled in yellow) you will need to loosen this nut with the
spanner supplied with your ribber, one turn should be enough, again do
not undo it completely it will cause you problems if you do. Now raise
the ribber back to the working position. Next we will need to adjust the
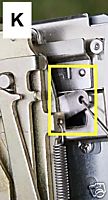
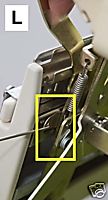
gap, locate the rise and fall adjuster, I have given you two pictures of
this ‘K’ & ‘L’ the adjuster is at the back of the leg. You can either
make the adjustment by hand or you can use the work hook supplied with
the ribber.
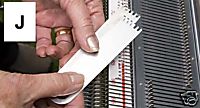
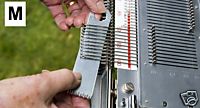
The adjustment is made by lifting or lowering this adjuster. I recommend that you use the two aluminium claw weight hangers (see picture ‘J’) as a feeler gauge. Place these two together to be able to use the thickness of these to get the distance between the two beds correct. Now place them over the top of the ribber gate pegs, pull forward 5 or 6 needles on the machine so that the claw weight hangers are sandwiched see picture ‘M’ you will need to move the ribber adjuster up and down so that the needles are just touching the hangers, get down to eye level, make sure that the needles do not rise. Obviously if your sponge bar is no good all of this will be a waste of time.
Once you have finished the left leg you should tighten the nut, recheck the settings to see that they have not moved and then repeat the exercise on the right leg. I recommend that you recheck both the height & alignment adjustments on a regular basis. You are now ready to start knitting.
I have had to split the topic of the Brother Ribber into two separate guides because of the limitation on the number of photos eBay will allow in any one guide.
END OF PART 2.
We sell a wide range of fully refurbished Brother knitting machines, ribbers, accessories, books & spares.
Why not take the gamble out of purchasing a knitting machine from an auction. If you want a knitting machine or ribber that works, is complete, comes with a guarantee arrives properly packed & has after sales telephone support then buy from us. Unless otherwise stated in the listing all of our machines have been fully refurbished & tested by our resident Brother trained knitting machine engineer. Take the worry & disappointment out of the purchase, we have the expertise to look after you with a reputation for good after sales service.
Please phone me to find out what machines are going through my workshops and will soon be available for sale. Most of my refurbished machines are booked for sale before they have gone through the workshops, hence I do not sell many via my eBay shop or my website.
|
We can be contacted by phone or email |
|
Payment: We accept PayPal, UK Cheques, Postal Orders & we take most credit cards.
|
![]()

